Thursday 28 May 2009

Making my Six trousers - part two

So far I have sewn all the pockets and prepared the button fly. All that remains now is to assemble the legs; add the waist band; and hem the ankles.

First up is sewing the legs together, plus a crotch gusset (see right) which gives a little more movement where it’s needed.

The outside seams are sewn first, pressed and top-stitched for strength.


At this stage the trousers look enormous when laid out flat (see left).
The triangular crotch gussets can be seen sticking out on the outside edges.

The back crotch is then sewn. The pattern is quite clever, as it gives you an extra inch allowance on both sides (two in total across the back) which you do not cut back. This can be used to let the trousers at a later date if adjustment is needed for whatever reason.

The inside leg is then sewn and I can try them for fit properly for the first time. This time they are a good fit; the waist is just right and the legs are loose but not too baggy.

Ideally I should then run a line of over-lock stitch along the seam allowance of the legs. This keeps the frayed edge from disintegrating. Sadly my 103 year old Singer Sewing Machine cannot do that stitch, so I trim the edges with pinking shears, a technique I found to work well when I was doing the lining of the coat.

Next up is adding the waist band (below left), which is sewn to line up with the side seam (below right). The middle of the back of the band is split in a V shape where the buttons for braces are located. Note the angle of the band in the picture below.

I think I am most nervous and unsure about doing this part of the whole garment. I need to understand the order in which to do things and how to end up with a neat and tidy result.

The proper instructions for this section are shown right – click to enlarge.

The next bit of detail I need to do is a back brace strap. This is not screen accurate for Colin Baker’s trousers, but I like the design and will follow it.
The straps are cut in fabric and lining (below top left) and sewn all round. Personally I then do a careful slit (below top right) where they will be attached to the trousers and turned right-side though the hole then pressed. This is not as the pattern, but I think it is a better way to do it, as I avoid doing hand-stitching again!
I do two buttonholes in one of the straps (below bottom left) before attaching them to the back of the trousers (below bottom right).

The result can be seen here, though I haven’t sewn the buttons in place as yet (see right).

I have set the strap slightly taught but not too tight.

The lining of the waist band is in two parts: the back of the band itself, and a ‘curtain’ that hangs down to cover the pockets and make wearing the trousers more comfortable.
These are sewn together, then attached at the top of the waist band, turned right-side and pressed.
I then trim and double fold the excess band to make a clean edge (below left). I carefully unpick a little of the stitching where the fly is attached and catch the curtain edge under it and re-sew (below right).

The proper instructions for this section are shown right – click to enlarge.

The last sewing to do is hemming the ankles (see below), after checking for length.


I then give the trousers a good pressing overall and it is just down to sewing the various buttons and a couple of strengthen stitch points around the trousers, such as the bottom of the fly, and they are all done.

I must say I was cuffed with the result. The pattern sized up well and was easy to follow with lots of clear line drawings to guide me through each stage. 
The pieces fitted together well and I did not need to adjust anything on the fly.
I think having some sewing experience definitely helped, but there were uncharted areas I have never done before that I sailed through with ease.

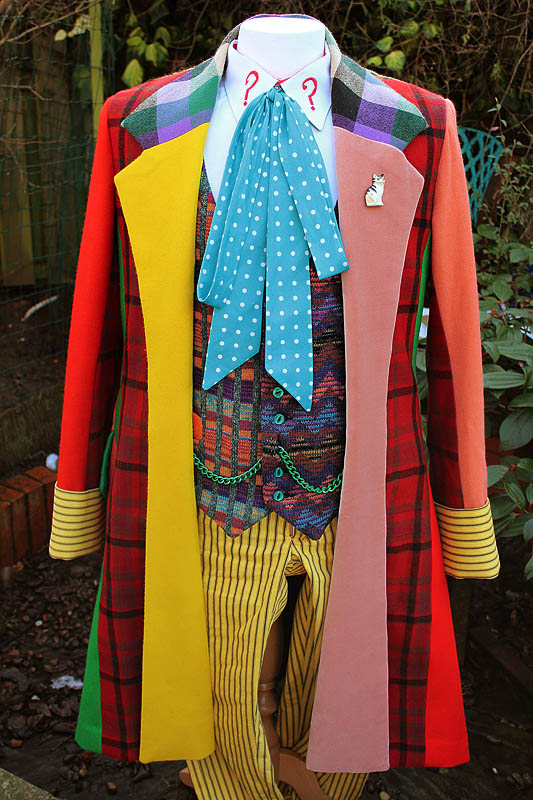
At long last I have some trousers to go with my Colin Baker coat I made back in 1985 – it’s just a shame that was made for me when I was 19 and a lot smaller . . . .
The images of the pattern instructions are reproduced with kind permission of Laughing Moon Mercantile.
I wish to thank them for agree for their use and for making such a great pattern available for sale.

Monday 25 May 2009

Making My Six trousers - part one

As you may know, I am making a pair of Six trousers, essential to get some practice before embarking on my Tennant suit trousers, but also for a little fun.

The pattern I am using is from Laughing Moon Mercantile, and are a replica of a mid to late 19th Century design. 
They are high waisted, intended to be held up with braces (as Colin Baker’s costume, see below) and have a button fly as well as a braced strapped back with hip pockets.

Most of these features match the trousers Colin Baker wore, however there are a couple of things that would need to be altered to make them more screen accurate: the pockets have horizontal entry where they should be vertical; the fly should be zipped not button; the waist-band needs to be narrower; and the back should not be split.

For once this is not about making a 100% screen accurate garment.
The purposes of this exercise is to test my ability to follow a commercial design rather than designing my own, so I intend adhering to the letter of the pattern throughout.

I have also never worked with anything other than a plain fabric, so I am learning skills of more accurate cutting and lining up pinstripes, something I will need to master before the Tennant suit.

I begin by cutting all the pieces I will need. 
It is really important to match the pinstripes up and make sure the trousers have perfect symmetry.
To to help you do this, the patter has a grain line marked on all pieces, which I line up (below left). Once I cut one side, I then flip the cut fabric over and line it up all round with the pinstripes of the fabric I am then going to cut. I can then easily cut a perfect mirror of all necessarily pieces (below right).

First thing to stitch are the front pockets. The pocket bags are oval in shape with a flat top, divided horizontally with fabric facing above and pocketing material below (see below top left).
I am not a very good hand-stitcher, so I slightly simplified the pattern to just be a straight divide between fabric and pocket lining, cheating I know.

This is then set about 1.5 inches in from the corners of the trouser fronts (see below top right). The seam allowance is then heavily cut back and clipped at the ends of the stitching line, then turned right side out and pressed (see below bottom left).

The proper instructions for this section are shown right – click to enlarge.

The pocket bag is then folded back in half and stitched along the bottom cresent, making a segment shaped pocket (see above bottom right).
When I folded the pocket back I found that by just folding a little further than indicated I could get the pinstripes to line up between the back of the pocket and the trouser fronts, something I will bear in mind when I am doing the Tennant Suit.

I then need to add some reinforcing stitching at the ends of the pocket fronts where they will get stretched and pulled. To do this I use, of all things, my buttonholer attachment (see right).
All aspects of the buttonhole are adjustable using various sliders and gauges, and it is possible to ‘collapse’ the buttonhole down on itself so it becomes a single row of zig-zag stitch. This make perfect reinforcing stitching.

Next to make up is the right fly front which has a single buttonhole at the top. It will later have a row of buttons down its height (see above left).

The left fly front is a panel which receives these buttons (see above right). The buttonholes are enclosed and this is sew into the left side of the fly.

The proper instructions for this section are shown right – click to enlarge.

I am using some medium weight calico for the lining, as this is off-white in colour and looks more period for late 19th Century.

(Seen left I have lain the two fronts together to show how they work, though they are not sewn at this stage.)

I then put these fronts to one side for now and turn attention to the backs of the trousers.

The backs have small darts at the top from the waistline to the back pockets. This is the same as the GAP trousers I need to match for the suit. 

Next to do are the back pockets. This is a good opportunity to do a dry-run, so I will follow the design of the GAP trousers rather than the pattern. This will be the only time I intend diverging from the pattern.
I cut welt strips (narrower than I usually do) and make a long narrow strip by folding a length of fabric a couple of times over to hide the raw edge then sew it together with a single line of stitch. This will form the loops that the pockets button with (see below top left).
I do a classic welted pocket, by sewing the two welts close to each other, upside down (see below top right). I am conscious I need to make it more delicate and lighter than I have historically done, as I am used to doing heavy coat pockets before.

I then carefully cut between the welts (see above bottom left) and cut the ends of the slit to a Y shape ending as close to the stitching lines as I dare (see above bottom right).
When the welts are turned to the back the pocket magically comes together.
I then add the pocket bag between the welts and sew the vertical sides (see below left).
When I sew the pocket backing to the top welt, I firmly pin and sew the button loops in place (see below right).

Pretty happy with the way that came out. They look nice and sharp and aren’t too heavy.

That’s enough for now, so I will finish them off in a couple of days.
The images of the pattern instructions are reproduced with kind permission of Laughing Moon Mercantile.
I wish to thank them for agree for their use and for making such a great pattern available for sale.

Six trousers - calico testing

When I did the Tennant Coat, I found it really useful and helpful to do a Calico Test before cutting my precious Alcantara fabric. It gave me the chance to assess fit; refine the pattern; and test out some design ideas to see how they would work.
I am currently quickly making a pair of Six trousers, just to get my skills up to speed for making trousers for my Tennant suit.

I am going through two calico tests before cutting my Yellow Ticking I have gone through hell to get right. 
The first is a quick mock-up with no pockets or fly front, but with the waist band, as this is integral to the cut of the trousers. This is solely to check that the pattern is sizing up right. I would hate to follow the pattern to the letter and get to the end only to find they are a circus clown fit on me or far too tight and  can’t even get them on.
As I explain before in Tailoring Trousers, I am copying a pattern from Laughing Moon Mercantile, and have prioritized preparing the pieces needed for the first calico test.

It is then a simple case of cutting the pattern in calico and stitching up the necessary seams and add the waist band (see right).

I found the fit around the waist to be pretty much spot on, but I felt the legs pantalooned out somewhat, so I will make some allowance for this before the second test.

Once I have fed back these findings from the first test to the pattern, I set about making a more finished test garment, following the pattern instructions closely and including every step along the way.
I will not outline the full making of the second calico trousers, as I would rather save showing you the ins and outs of pattern when I am making the final version.
This will be much nicer to look at too!

Here are a few pictures of the trousers at stages of making showing the marked-out button fly (below top left); the button fly assembled (below top right); the front pockets (below bottom left); and the back pocket (below bottom right), which I have based closely on the ones on GAP trousers used for the Tennant Suit, to get some practice in.

The finished result (see below) again fitted well, but I think I took the legs in too much, so I need to take that into account with the final version. 

These tests took three days to complete, and have verified the pattern as well as given me some invaluable understanding of how to assemble the trousers before cutting the final fabric.
There have been several little tricks I have picked up, which if I was to disassemble a pair of trousers, I would not have picked up on.

All I need to do now is make the real things!

Saturday 23 May 2009

Making Phoenix fabric


I was going to call this entry: “Well that’s annoying!”, but luckily I pulled things back from defeat.

Things haven’t gone as planned this week.

I previously posted that I am making a pair of Six trousers before doing the ones for the suit, so I can get some practice in.

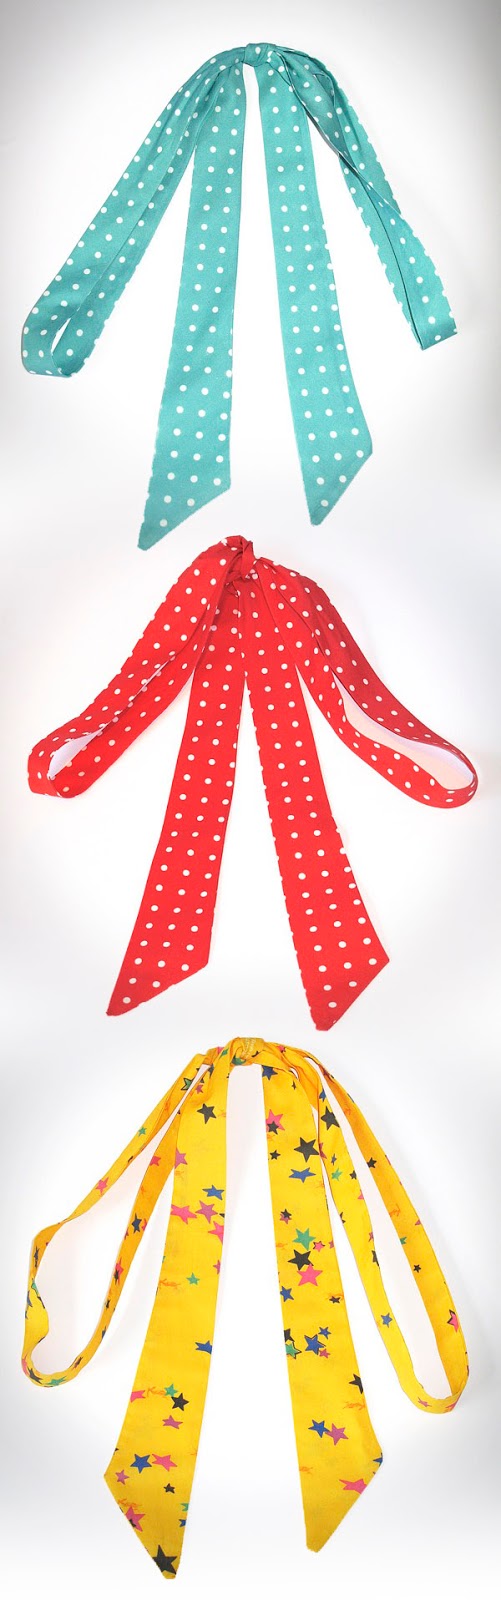
From the Six Breakdown on dw_cosplay I had found and ordered some of the Yellow Ticking (see left) from Interior Mall.
Their website says they ship worldwide, but do not quote shipping prices, asking you to enquire direct for a quote.
When I got a reply I found their shipping costs to the UK were very over priced at US$58 for sending just 4 yards of fabric (value US$70).
Luckily I have a friend in San Diego who had something to send me and he agreed to take delivery of the fabric and add it to the shipment before dispatching it to me.
This simplified things, and I can’t thank him enough for making that happen.

Before forwarding it on to me my friend thought the material was not quite right, saying his recollection of Colin Baker’s trousers was that they had a single stripe. I had always thought this as well, but had found that the trousers he wore for his first season were actually a triple stripe: two narrow ones either side of a thicker one. A nice clear image of this can be seen on DoctorWhoProps.com (see below). The Interior Mall fabric looked to be a good match.

He also thought the colour was a little off, but I’d have to see that to know what he meant.

The packaged arrived this week, and to my horror I saw exactly what he meant.
It was totally the wrong colour! Instead of being a vibrant yellow it was a light oatmeal instead, and looked to be a match to another colour on their site, the swatch for which can be seen here (right).

This was really annoying – thanks Ray (who cut and packed it according to the attached ticket). Pillow ticking, as this fabric is known, is relatively commonplace, and I had found several suppliers in the UK (Tinsmiths had a good range) though they did not have the right yellow with black stripes. So I had only gone to Interior Mall for the colour!

So all that effort was effectively for nothing.
Urrggghhhhh*@!


I will have to abandon using the Interior Mall fabric, as returning it to the US and getting new stock will be an extra expense I cannot justify, especially since ticking is not an expensive fabric, so replacing will be cheaper. I will retain the Interior Mall fabric and use it for something else (don’t worry, I have something in mind).

Instead I have decided to bite the bullet and buy some new ticking in the UK (from John Lewis) that is white with black stripes and dye it to the right colour, something again I have never done before, so this will be an experience and a challenge.

In a Comparing Fabrics style, here is the Interior Mall fabric (below top) compared with the UK-sourced John Lewis ticking (below bottom).

In hindsight I think the Interior Mall fabric has the stripes too close together anyway (see above). I am also not keen that the stripes are printed, not woven as I had found with the replacement UK-sourced fabric.

I found some colourfast Dylon fabric dye in Sunflower Yellow (which sounds nice) at a local wool shop (see left). This can be used in a washing machine at 40degrees. I also need to buy 1lb of salt, which is used to open the pores of the fabric and make the dye fast.
This is one of the occasions I think reading the instructions on the packet would be wise (being a man I don’t often do that).


First I need to wash the fabric thoroughly, to make sure there is no grease or dressing on the material, this will resist the dye and make it come out patchy.
I then empty the entire packet of dye into the drum of the washing machine, add 1lb of table salt, then the still wet fabric (see right).

I then have to wait a nerve-racking hour for the machine and dye to do its magic.
Once the hour is up it’s time to see what‘s happened, and I am pleasently surprised to find it has worked a total treat. My white and black ticking is now yellow and black, and the dye has not tainted the black stripes as I secretly thought it might (see left).

I just then need to leave it out to dry then thoroughly press it to make it pristine and ready for use (see below).

In the long run, I think I have now ended up with a better fabric than I ordered from Interior Mall. It is a proper woven pattern, and as a result the pinstripes on it are nice and sharp. Achieving the colour was nowhere near as scary or difficult as I thought. I think this is an exceptional case, but I would consider doing this again if finding the right pattern/colourway was a problem. If a white colourway was available as an alternative, dye it to the right colour is now very much an option!

Finally, comparing my fabric to a detail close-up of an actual pair of the Colin Baker trousers, I think I have got a pretty good match!

Monday 18 May 2009

Tailoring Trousers - practice urgently needed

I have never made a pair of trousers in my life. I just want to clear that up!

For the jacket part of the suit, I have deconstructed the Honest Dragon jacket and am cribbing some (but not all) of the pattern from there. The trousers, however, were the worst fit imaginable, being around 5 inches too big in the waist. There is no way I can successfully work with these, not having any experience of trousers.

I therefore have bought a Vogue pattern for a classic Men’s Suit (GRE V1753), and will simply make the trousers to that pattern, brining into it the features of the Ten suit I have researched.
But before I go head-long into making those, I thought I would get some practice in by making some other trousers first.
I will run these in parallel with making the calico and moleskin jacket, so hopefully when I have nailed the jacket and the methods of making trousers, I will be all fired up and ready to make my Tennant suit from Jo-Ann fabric.

I work best with a goal to focus my mind. So rather than just doing some random trousers, I have chosen to make some Six trousers, inspired by some previous postings on dw_cosplay entitled Six Breakdown. They are fairly loose, so tight tailoring is minimal, which I think will help my confidence while making them.

Someone had found the right fabric Yellow Ticking (see left) and a suitable pattern from Laughing Moon Mercantile.

I have never really done anything to a commercial pattern before, having always designed my own because I felt nothing else would be suitable. So while making these, I thought I’d share the experience of working with an established pattern.

I ordered the Lauging Moon’s pattern #106, Californian Pants (see below), and the yellow ticking, which I hope to take delivery of soon.

Click on picture to enlarge
Here is how the pattern is described:
Mid to Late 19th Century (1850 - 1900) Civilian Style Pants. The front has vertical front pockets, a button fly, and suspender buttons. The back can have two welt pockets or none at all, a back cinch belt and a split back waistband with suspender buttons. The hems at the bottom of the legs are shorter at the center front than the center back and have a very slight flare.
For those who have never purchased a pattern before, it comes tightly packed in an A5 sized envelope, with the pattern itself on the thinnest tissue paper imaginable!

Each part of the pattern is made up of all a range of similar sizes superimposed over each other, so you need to choose the one you want and work to the appropriate line (see right).
For this pattern they code the sizes 1 to 12, with each code covering various sizes within a fitting range of Men’s Slim, Men’s Mature, Men’s Portly or Women’s.
I will work to the Men’s Slim fitting; and to size 6, which covers waist 38. I am a little smaller than this, but would rather work to a pattern I can take in a little rather than not have any to work with.

If I cut the original pattern paper for the size I want, and find it is wrong, I won’t be able to rescue the other sizes. So I use a tracing wheel (see below) to transfer the pattern to my own pattern paper, which I then cut out and use. This way I always have the original pattern to refer back to.

I got the tracing wheel from Jaycotts, where I have got most of my clever little gadgets over the years. They are an Aladdin’s cave of things for bespoke needs.

While transferring the pattern (see below) I foolishly look at what I have cut out and find that at this stage I have no clue how half of these curiously shaped and notated pieces become part of the trousers!
All will become clear no doubt . . . . I hope.

Then to check the size for fit before storming into make the trousers, I have quickly cut the four main pieces that make up the legs from calico (see below).
I will then sew them together without setting any pockets or the fly front. I will however, add the belt band as this is crucial to the waist and how it ultimately fits.

I didn’t have any time on Sunday to get any actual sewing done, so seeing how it fits will have to wait until another day.
Time was short as I was off to The Roundhouse in Camden Town to see a special one-off concert given by the BBC Radiophonic Workshop, which was great fun and well worth the effort of going.